> ## Documentation Index
> Fetch the complete documentation index at: https://docs.gridix.live/llms.txt
> Use this file to discover all available pages before exploring further.

# Widget Embedding

> Generate and embed interactive Gridix widgets on your website

<Frame>
  <img src="https://mintcdn.com/gridix-ec02c1e8/hTol0d7r52_dOb8U/images/Gridix---widget.png?fit=max&auto=format&n=hTol0d7r52_dOb8U&q=85&s=6ea12867a7aa172e4daaebb4da3653d8" alt="Gridix widget on a website" width="3600" height="2172" data-path="images/Gridix---widget.png" />
</Frame>

Gridix widgets let you embed interactive floor plans, apartment availability, and lead forms into a developer or agency website. Visitors stay on your website, explore available units visually, and submit an inquiry without opening a separate Gridix workspace.

The usual setup is simple: choose a project in Gridix, generate the embed code, paste it into your website, and test the experience on desktop and mobile.

<Note>
  **Video:** example Gridix project workflow. If you have a dedicated widget generation video, use it here.
</Note>

<iframe src="https://www.youtube.com/embed/nIbp3pd9Mio" title="Example Gridix project workflow" frameborder="0" className="w-full aspect-video rounded-xl" allow="accelerometer; autoplay; clipboard-write; encrypted-media; gyroscope; picture-in-picture; web-share" allowFullScreen />

## Simplest path

If you are setting up the widget without a developer, follow this short flow first.

<Steps>
  <Step title="Generate the code in Gridix">
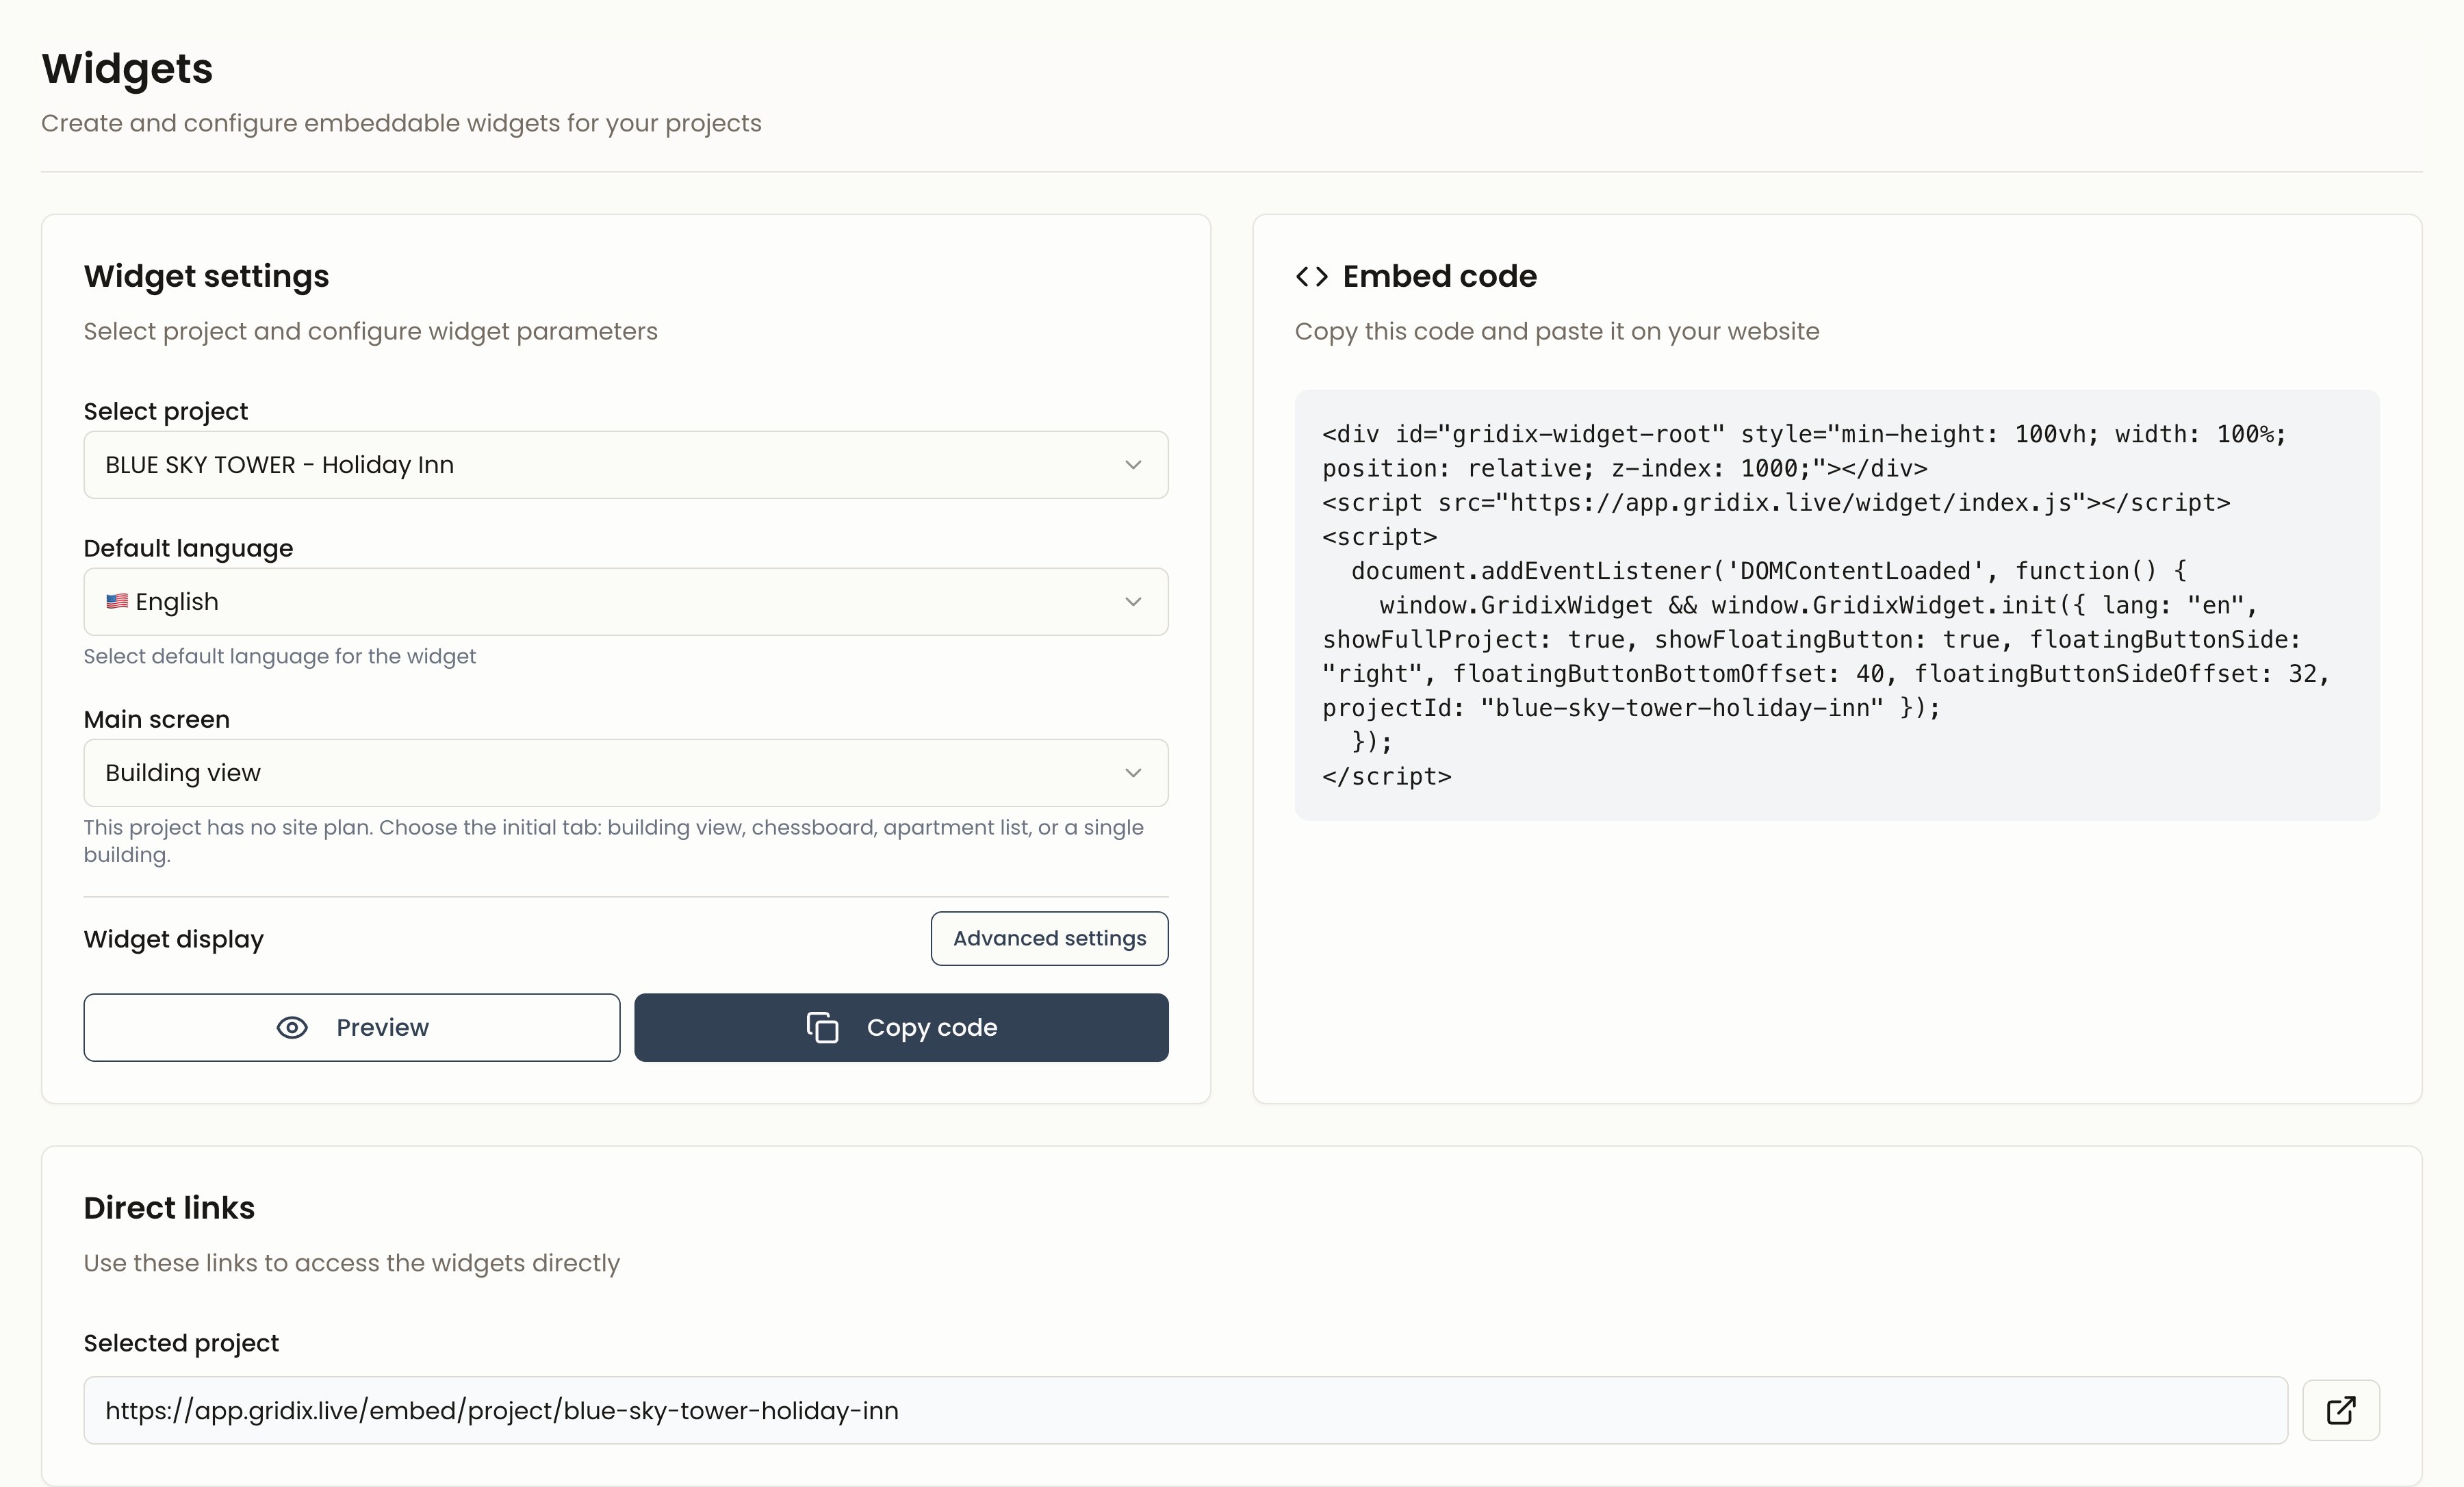
    Open the widgets section, choose the project, and select the interface language.
  </Step>

  <Step title="Paste the code into your website">
    Use an HTML block in your CMS or send the code to the person who manages your website.
  </Step>

  <Step title="Test a lead">
    Open the published page as a regular visitor and submit a test inquiry.
  </Step>
</Steps>

## What the widget does

The widget brings the main Gridix buyer experience into your website:

* **Interactive floor plans**: visitors can select apartments directly on the visual plan.
* **Lead collection**: inquiry forms are part of the browsing flow.
* **Multi-language interface**: English, Russian, Georgian, and Arabic are supported.
* **Responsive layout**: the widget works across desktop and mobile screens.
* **Brand fit**: the surrounding page and container can match your website design.

## Before you start

Before embedding the widget, make sure that:

* the project is published and has up-to-date floor plans;
* apartments, prices, and availability statuses are configured;
* lead forms are enabled and route leads to the correct Gridix workspace;
* you have access to the website HTML, CMS custom-code block, or website developer.

## Get the embed code

### Step 1. Open the widget generator

<Steps>
  <Step title="Go to widgets">
    Open the widgets section in the Gridix admin dashboard.
  </Step>

  <Step title="Select a project">
    Choose what the website should display:

    * one specific project;
    * all developer projects.
  </Step>

  <Step title="Choose the default language">
    Set the default interface language:

    * English (`en`);
    * Russian (`ru`);
    * Georgian (`ka`);
    * Arabic (`ar`).
  </Step>
</Steps>

### Step 2. Copy the code

<Steps>
  <Step title="Review the settings">
    Confirm that the selected project and language are correct.
  </Step>

  <Step title="Copy the embed code">
    Use the copy-code button to get the ready-to-use embed snippet.
  </Step>

  <Step title="Paste it into your website">
    Add the code to an HTML page, CMS block, or website template.
  </Step>
</Steps>

## Basic embed code

```html theme={null}
<div id="gridix-widget-root"></div>
<script src="https://your-domain.com/widget.js"></script>
<script>
  document.addEventListener('DOMContentLoaded', function() {
    window.GridixWidget && window.GridixWidget.init({
      lang: "en",
      projectId: "your-project-id"
    });
  });
</script>
```

The snippet has three parts:

* **Container**: `<div id="gridix-widget-root"></div>` defines where the widget appears.
* **Script**: loads the Gridix widget library.
* **Initialization**: passes the project and language settings.

## Where to find `projectId` and `userId`

* `projectId` is used when the page should display one specific project.
* `userId` is used when the page should display all projects for a developer or agency.
* These values come from your Gridix workspace or from the ready embed code generated in the widgets section.

<Tip>
  In production, replace `your-domain.com`, `your-project-id`, or `your-user-id` with the values from your Gridix workspace.
</Tip>

## Embed on your website

<Tabs>
  <Tab title="Do it yourself" icon="user">
    <Badge color="green" size="sm">Simple</Badge>

    Use this path if your CMS has a block for custom HTML or embed code.

    <Steps>
      <Step title="Open the page in your CMS">
        Go to the project page, landing page, or floor-plan section where the widget should appear.
      </Step>

      <Step title="Add an HTML block">
        Look for a block named "HTML", "Custom HTML", "Embed", "Code", or something similar.
      </Step>

      <Step title="Paste the embed code">
        Paste the code from Gridix, save the page, and open preview.
      </Step>
    </Steps>
  </Tab>

  <Tab title="HTML" icon="code">
    <Badge color="blue" size="sm">For developers</Badge>

    <Steps>
      <Step title="Open the HTML file">
        Find the page or template where the widget should appear.
      </Step>

      <Step title="Choose the placement">
        Paste the snippet where visitors should see the floor plans.
      </Step>

      <Step title="Publish the page">
        Save the file and deploy the updated page to your web server.
      </Step>
    </Steps>
  </Tab>

  <Tab title="WordPress" icon="wordpress">
    <Badge color="green" size="sm">CMS</Badge>

    <Steps>
      <Step title="Open the page">
        Edit the page or post where the widget should appear.
      </Step>

      <Step title="Add a custom HTML block">
        Use a Custom HTML block or another block that allows scripts.
      </Step>

      <Step title="Paste the embed code">
        Add the Gridix snippet and update the page.
      </Step>
    </Steps>
  </Tab>

  <Tab title="CMS / no-code" icon="layout-template">
    <Badge color="green" size="sm">CMS</Badge>

    For Drupal, Joomla, Webflow, Tilda, and other CMS platforms, use the same logic: find a custom HTML/code insertion option, paste the Gridix embed code, and save the page.

    If the platform removes `<script>` tags, send the code to your website developer or use the template-level custom code section.
  </Tab>
</Tabs>

<Warning>
  Some CMS platforms remove `<script>` tags from regular text blocks. If the widget does not appear after publishing, use an HTML/Embed block or send the code to your website developer.
</Warning>

<Warning>
  Do not reuse the same `gridix-widget-root` container multiple times on one page. If you need several widgets, give each one a different `containerId`.
</Warning>

## Settings for integrators

If you do not work with code, you can send this section to your website developer together with the embed code.

<CodeGroup>
  ```javascript One project theme={null}
  window.GridixWidget.init({
    lang: "en",
    projectId: "your-project-id"
  });
  ```

  ```javascript All projects theme={null}
  window.GridixWidget.init({
    lang: "en",
    userId: "your-user-id"
  });
  ```

  ```javascript Advanced setup theme={null}
  window.GridixWidget.init({
    lang: "en",
    projectId: "project-id",
    theme: "light",
    showControls: true,
    enableSearch: true
  });
  ```
</CodeGroup>

<Accordion title="What the parameters mean">
  * `lang`: the widget interface language. Use `en` for English pages.
  * `projectId`: displays one specific project.
  * `userId`: displays all projects for a developer or agency.
  * `theme`: the widget visual theme, if supported by your configuration.
  * `showControls` and `enableSearch`: additional controls inside the widget.
</Accordion>

### Container size

Give the container a stable width and minimum height so the page does not jump while the widget loads:

```html theme={null}
<div id="gridix-widget-root" style="width: 100%; min-height: 640px;"></div>
```

## What to send to your website developer

If a developer or contractor will embed the widget, send them:

* the ready embed code from Gridix;
* the page URL where the widget should be added;
* the display mode: one project through `projectId` or all projects through `userId`;
* the interface language: `lang: "en"`;
* the minimum container height: `min-height: 640px`;
* the requirement to submit a test lead after publishing.

## Minimum checklist before publishing

<Steps>
  <Step title="Open preview">
    Use Gridix preview or a temporary page on your website.
  </Step>

  <Step title="Check the main flow">
    Confirm that floor plans open, lead forms work, and the selected language is correct.
  </Step>

  <Step title="Check mobile">
    Open the page on a phone or use responsive preview in your browser.
  </Step>

  <Step title="Submit a test lead">
    Make sure the lead appears in Gridix and contains the correct source.
  </Step>
</Steps>

<Check>
  After publishing, open the page in a regular browser without CMS admin access. This checks the real visitor experience.
</Check>

## Troubleshooting

<AccordionGroup>
  <Accordion title="Widget is not displayed">
    Check the script URL, the `gridix-widget-root` container, the `projectId`, and browser console errors. A common cause is a CMS block that removes `<script>` tags.
  </Accordion>

  <Accordion title="Widget is blank">
    Make sure the project is published and contains floor plans, apartments, and display-ready data.
  </Accordion>

  <Accordion title="Leads are not collected">
    Check that lead forms are enabled, the project settings are correct, and a test form submission reaches Gridix.
  </Accordion>

  <Accordion title="Widget is too short or clipped">
    Set a minimum container height, for example `min-height: 640px`, and check the styles of the parent block on your website.
  </Accordion>
</AccordionGroup>

## Best practices

<Tip>
  Always preview the widget before publishing it on a live website.
</Tip>

<Tip>
  Use `lang: "en"` for English pages so the widget opens in English by default.
</Tip>

<Tip>
  After publishing, test the page in a regular browser, not only in CMS preview mode.
</Tip>

## Next steps

* [Project Management](/en/projects/creation) - Prepare projects and floor plans for the widget.
* [Lead Management](/en/leads/overview) - Track leads collected through the embedded widget.
* [Custom Domains](/en/domains/setup) - Connect branded domains for Gridix projects.